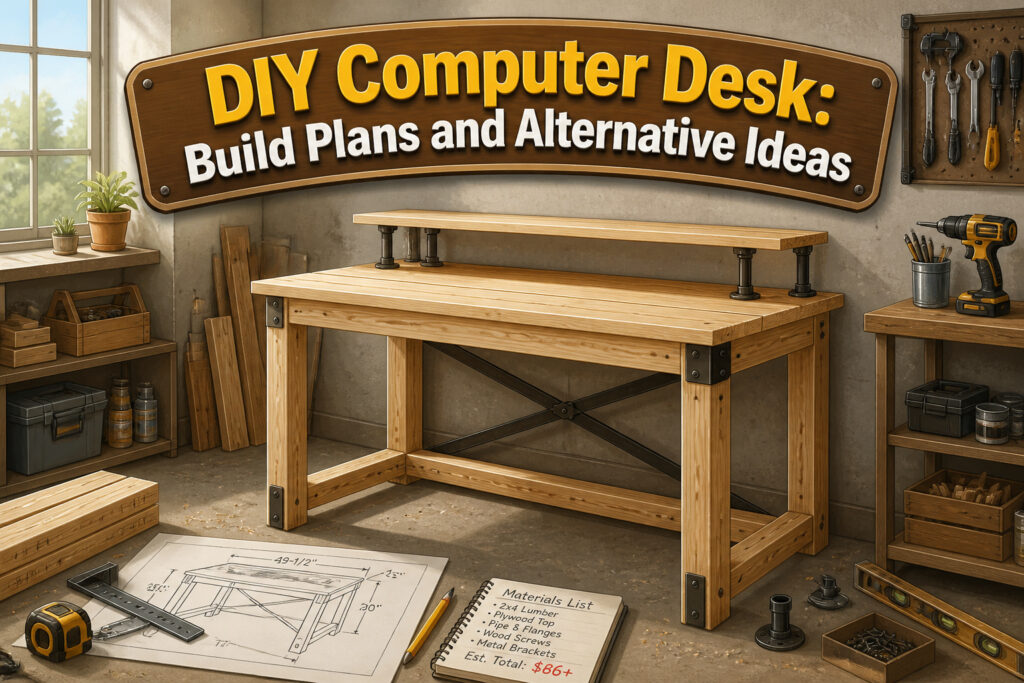
A DIY computer desk is a custom-built workstation you assemble from lumber, pipe, or salvaged materials rather than buying prefabricated. The catch is that the frame alone eats most of an 8-hour build day, and the legs will still wobble if you skip the back brace or overdrive your screws into soft pine. The finished desk runs 49-1/2 inches long by 25 inches wide by 30 inches tall, with materials starting around $86 in standard 2x4s.
Cut and Assemble the Legs
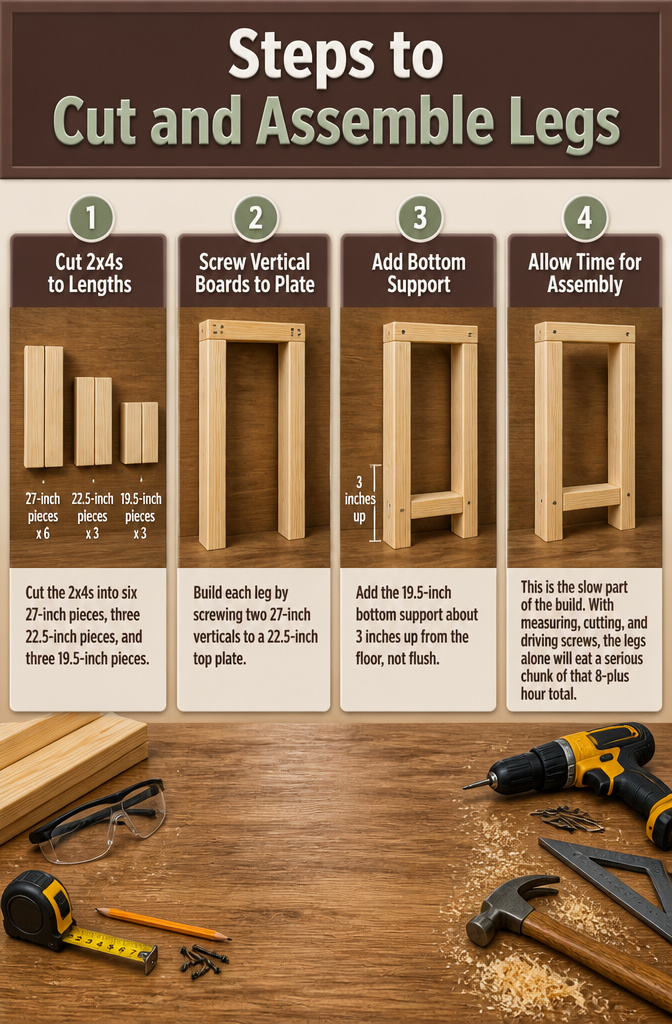
The lumber for this desk ran about $86 for standard 2x4s, though premium 2x2s work as a cleaner-looking alternative if you want less bulk.
- Cut the 2x4s into six 27-inch pieces, three 22.5-inch pieces, and three 19.5-inch pieces. On a 10-foot 2×4, you can hit most of these lengths without much waste if you plan the order before you start.
- Build each leg by screwing two 27-inch verticals to a 22.5-inch top plate. Two 3-inch screws per joint is enough; pre-drilling keeps the ends from splitting.
- Add the 19.5-inch bottom support about 3 inches up from the floor, not flush. Two screws on each face into the support keeps the leg square and gives you a toe-kick gap that reads as intentional.
This is the slow part of the build. With measuring, cutting, and driving screws, the legs alone will eat a serious chunk of that 8-plus hour total. I would not start this after lunch on a Sunday unless you want to finish in the dark.

High Performance: Made of durable steel, it can stably support all kinds of heavy items, such as kitchen countertops and storage racks. No matter how many items you put, you can rest assured that you can rely on their strong support. Load: 500 pounds

【Versatile & Functional】 This multi-functional rolling desk serves as a practical workspace solution for home offices and daily use. It helps organize your items and greatly improves your working efficiency with flexible and user-friendly features.
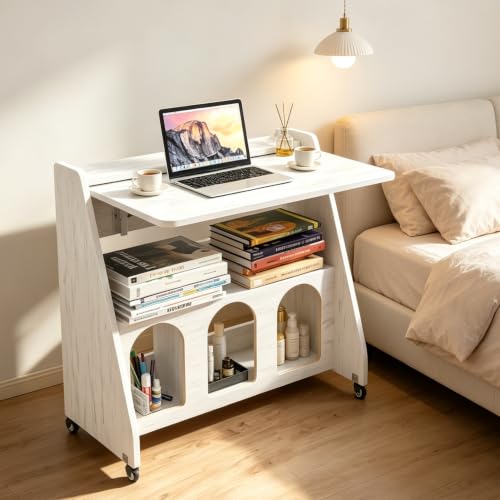
【Versatile & Functional】 This multi-functional rolling desk serves as a practical workspace solution for home offices and daily use. It helps organize your items and greatly improves your working efficiency with flexible and user-friendly features.
Cut the Desktop and Shelves
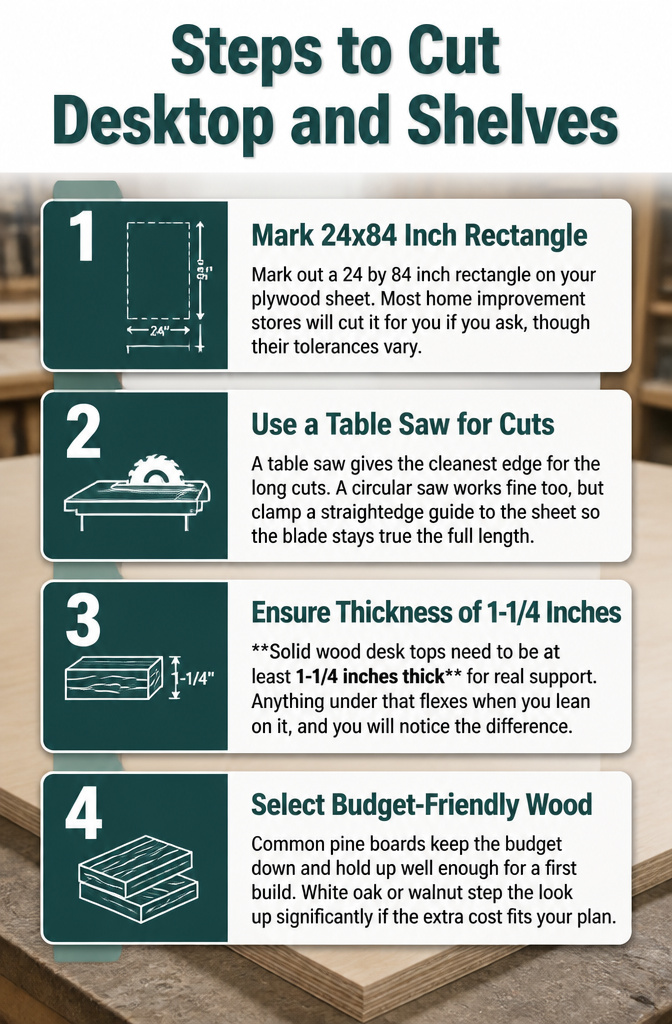
- Mark out a 24 by 84 inch rectangle on your plywood sheet. Most home improvement stores will cut it for you if you ask, though their tolerances vary.
- A table saw gives the cleanest edge for the long cuts. A circular saw works fine too, but clamp a straightedge guide to the sheet so the blade stays true the full length.
- Solid wood desk tops need to be at least 1-1/4 inches thick for real support. Anything under that flexes when you lean on it, and you will notice the difference.
- Common pine boards keep the budget down and hold up well enough for a first build. White oak or walnut step the look up significantly if the extra cost fits your plan.

COMPLEMENT YOUR EXISTING STYLE. Bring your kitchen together with an industrial table. Cast iron pipe pairs wonderfully with wood of a variety of shapes and sizes and fits...
Attach Legs to the Desktop
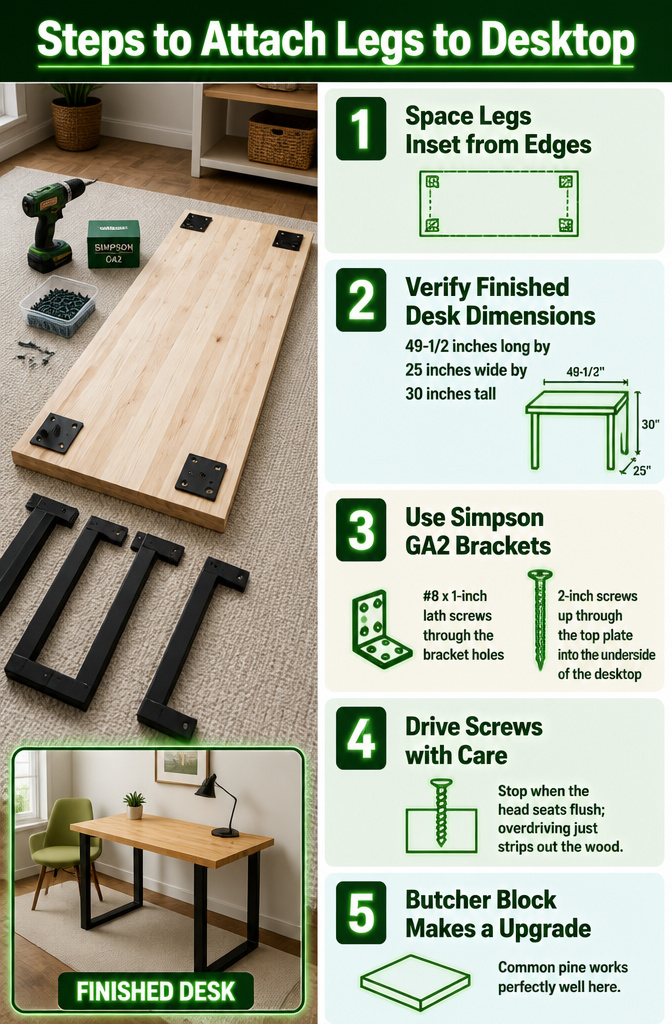
- Space each leg 1-1/2 inches in from the front edge and both side edges, keeping the back leg flush against the back edge of the desktop. This inset leaves a lip that keeps the desk from looking slab-sided and gives your knees a little clearance.
- The finished desk will measure 49-1/2 inches long by 25 inches wide by 30 inches tall. Check that layout against your chair and floor space before you drill anything.
- Attach the legs with Simpson GA2 brackets. I use #8 x 1-inch lath screws through the bracket holes, then run 2-inch screws up through the top plate into the underside of the desktop. A 2-inch length hits the sweet spot: enough bite to hold, not so long that it punches through the surface.
- Drive slowly. The lath screws grip the bracket fine, but the longer screws into the desktop bottom are the ones to watch. Stop when the head seats flush; overdriving just strips out the wood.
- Butcher block makes a handsome top if you want to upgrade, though the extra cost pushes this out of the weekend-and-a-few-hundred-dollars territory. Common pine works perfectly well here.

【Height Adjustability & Floor Protection】: The adjustable feet are designed to level the legs by the screw on the bottom(adjustment range:1.2 in), it helps you to get a suitable-height and stable table. The feet's material is great for preventing a wobbly table and protecting the floor from scratching.

【Height Adjustability & Floor Protection】: The adjustable feet are designed to level the legs by the screw on the bottom(adjustment range:1.2 in), it helps you to get a suitable-height and stable table. The feet's material is great for preventing a wobbly table and protecting the floor from scratching.

【Height Adjustability & Floor Protection】: The adjustable feet are designed to level the legs by the screw on the bottom(adjustment range:1.2 in), it helps you to get a suitable-height and stable table. The feet's material is great for preventing a wobbly table and protecting the floor from scratching.
Add the Back Brace
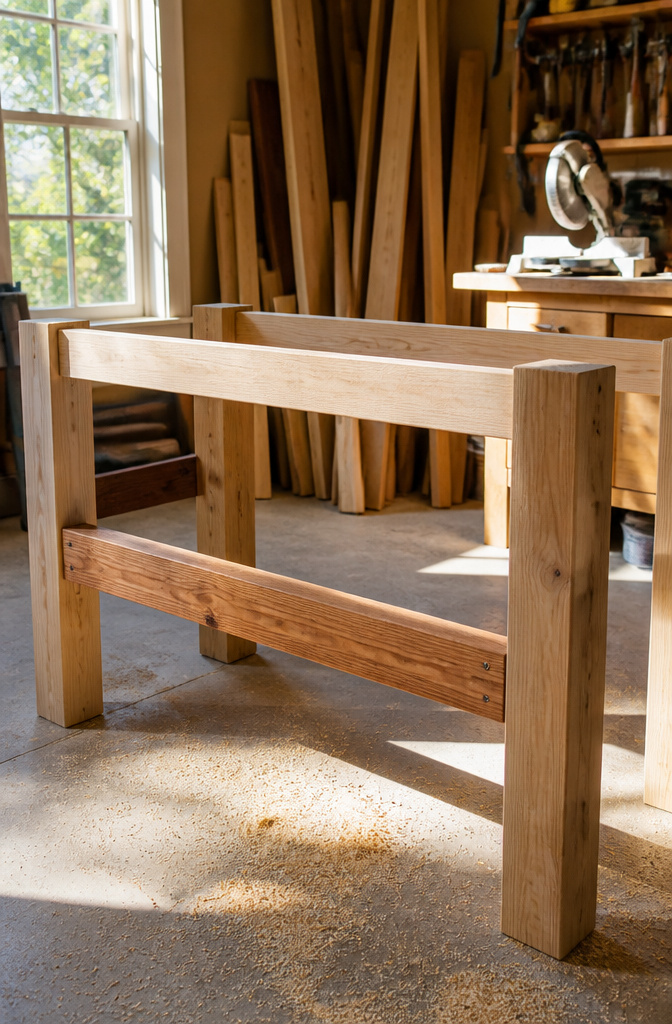
- Cut two 2x4s to the exact inside spacing between your legs so the back brace sits flush without forcing the frame apart or leaving gaps.
- Stand the assembled legs upright and clamp the first brace across the back, roughly halfway up the leg height. Check with a level, then toe-screw through the brace into each leg with two 2-inch screws per joint, drilling at roughly a 45-degree angle so the threads bite across the grain instead of splitting it.
- Add the second brace near the bottom, repeating the same toe-screw method. The two braces form a rectangle with the legs that resists the sideways racking you get from typing or leaning elbows on the desk.
- Test the frame before anything else gets attached. Push against a top corner; if it shifts, the screws are loose or the brace is too long and bowing the legs outward. Fix it now, because the desktop will hide the problem without solving it.
LASERABLE - Laser safe plywood for vector cutting and engraving.

Not treated against toy and decay like pressure-treated plywood

LASERABLE - Laser safe plywood for vector cutting and engraving.
Install Shelf Supports
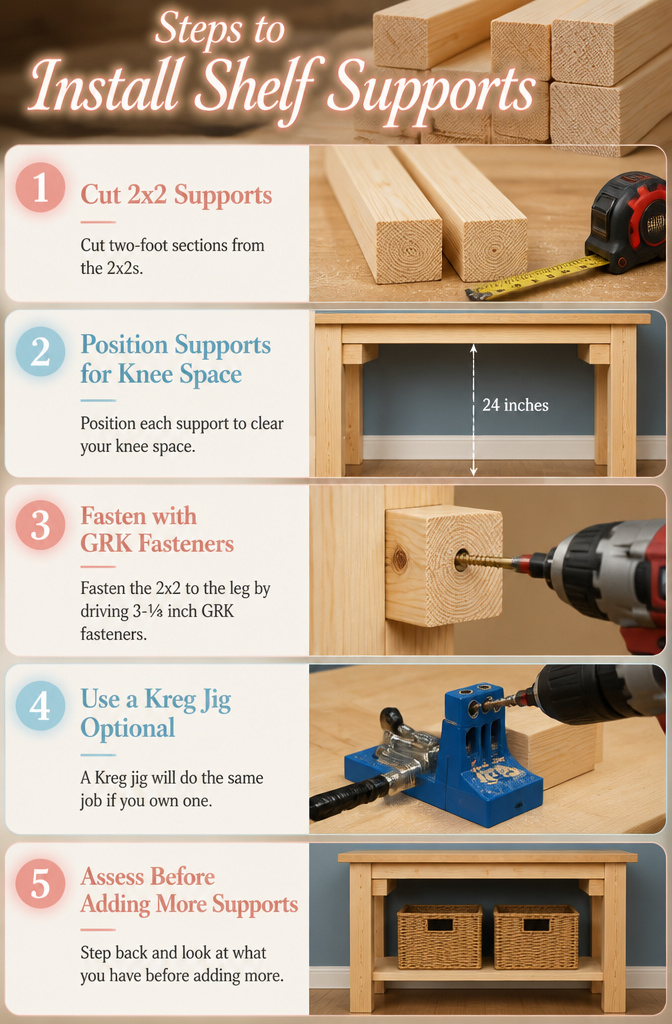
- Cut two-foot sections from the 2x2s for each shelf support you plan to install. These small blocks carry more weight than their size suggests, so the cut needs to be square.
- Position each support to clear your knee space while still landing under the shelf load. Too high and the shelf sits useless; too low and your legs hit wood every time you roll forward. The usual compromise leaves roughly 24 inches of open height beneath the desktop.
- Fasten the 2×2 to the leg by driving 3-⅛ inch GRK fasteners through the 1.5 inch face of the 2×4 leg and into the end of the support. An impact driver handles this quickly. Skip the toe-screw angle here; the 2×2 is small enough that the angled entry tends to split the grain.
- A Kreg jig will do the same job if you own one, though the face-screw method needs no extra gear.
- Step back and look at what you have before adding more. Two supports at the back give you storage; none at all keeps the leg frame clean and open. This is the last easy point to change your mind.

HEAVY DUTY STABILITY: Crafted from robust iron, these corner brackets firmly secure table legs to aprons and tabletops; effectively eliminates wobbling for dining tables, desks, or workbenches; ensures long-term safety and support

Attaches large legs to the bottom of tables/slabs and workstations
Cut and Fit the Shelves
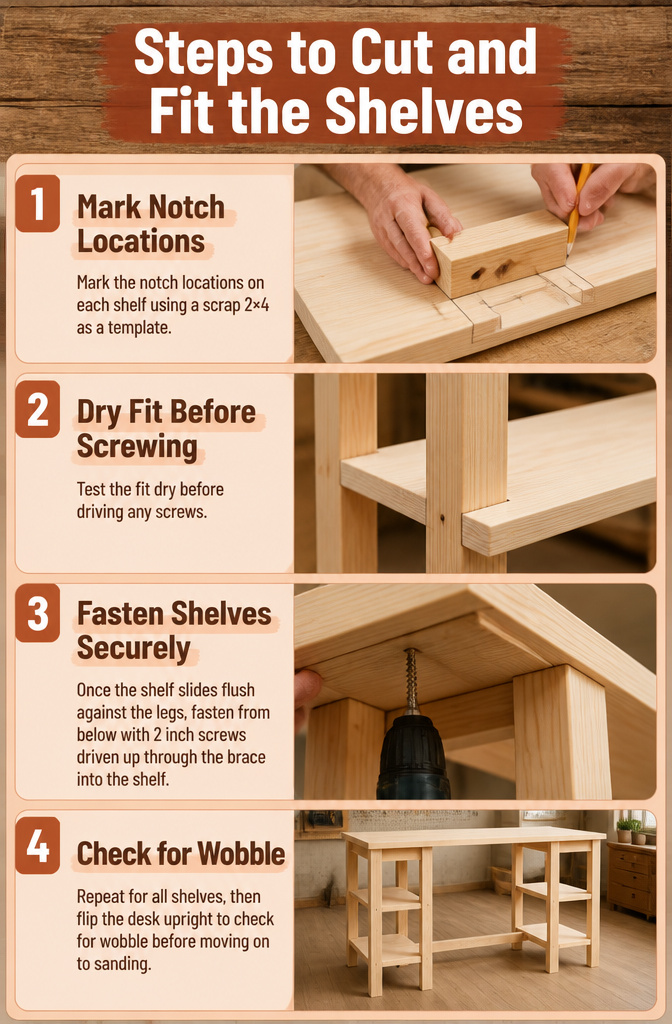
- Mark the notch locations on each shelf using a scrap 2×4 as a template; this traces the exact 3.5 by 1.5 inch cutout the leg will pass through. A jigsaw handles the cut cleanly, though a hand saw works if that is what you have.
- Test the fit dry before driving any screws. The notches almost always need a hair trimmed or the spacing nudged; this is where the leg measurements from earlier either save twenty minutes or cost an hour of back-and-forth.
- Once the shelf slides flush against the legs, fasten from below with 2 inch screws driven up through the brace into the shelf. No brackets are needed; the brace and the leg joint carry the load.
- Repeat for all shelves, then flip the desk upright to check for wobble before moving on to sanding.

COMPACT PETITE WORKSURFACE: This compact computer desk has a rectangular shape with rounded corners, an open back, and a 2-tier profile with a keyboard tray, so it fits home office, study room, dorm, and bedroom setups without crowding the area. Built for small space use, the desk helps create a focused workstation where floor area is limited

Real Fir Wood Desktop: This IBF solid wood computer desk features a high-quality, natural premium fir wood desktop. this desk is environmentally friendly and showcases the natural beauty of wood grain, combined with K-shaped metal legs to ensure stability and durability. and adding a touch of elegance to your home.

Adjustbable Monitor Stand & Hutch: This small desk features an adjustable shelf. Lower it to bring your screen to eye level for a natural posture—keyboard and mouse tucked underneath to free up space. Raise it to display plants or decor, adding extra functionality
Sand and Finish
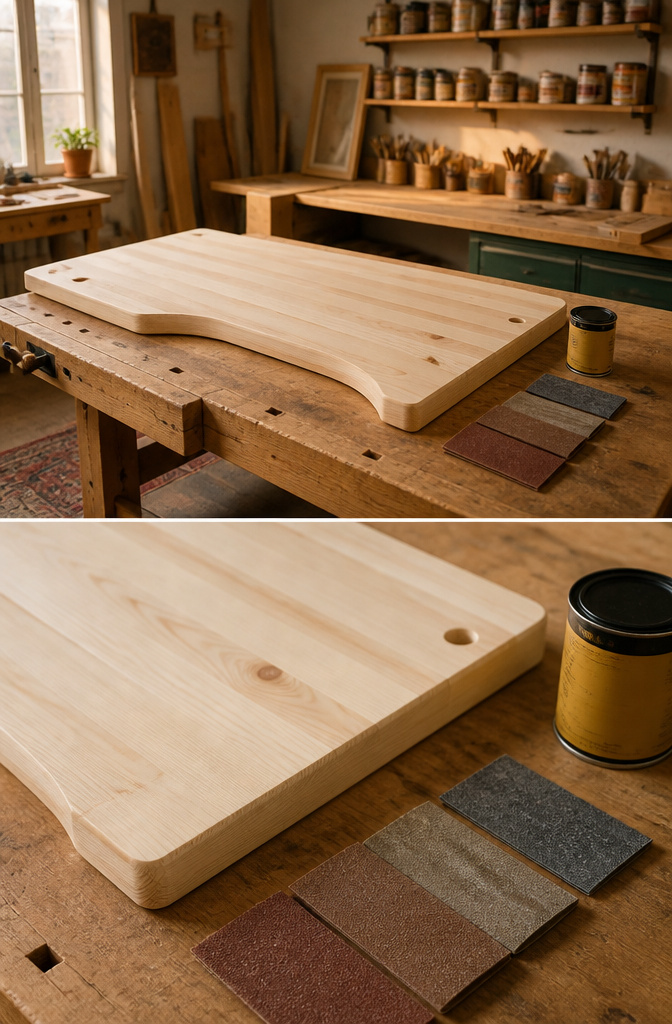
- Start with 120-grit on every edge and face, then move to 150 and stop at 220. The jump from 120 to 220 skips too many tooth marks and the stain catches unevenly, especially on the end grain of SPF whitewood where the soft summer growth rings sit almost proud of the harder latewood.
- Pine and whitewood take finish differently enough that the same stain can read orange on one and muddy on the other. Whitewood’s lighter, more uniform grain usually needs less conditioner, though both benefit from it. I test on cutoff scraps first, never on the underside alone where the grain direction differs.
- Paint hides the grain mismatch entirely and reads cleaner in a rental where the desk might follow you through two apartments. Two coats of latex enamel with light sanding between at 220 is enough for daily use.
- I skip polyurethane on any desk that holds a hot laptop. The finish softens where the chassis sits, then dust sticks in the tacky spot and the sheen never recovers. An oil-based stain with its own slight build, or a hardwax oil, handles heat better and repairs without stripping the whole top.
Trestle Desk
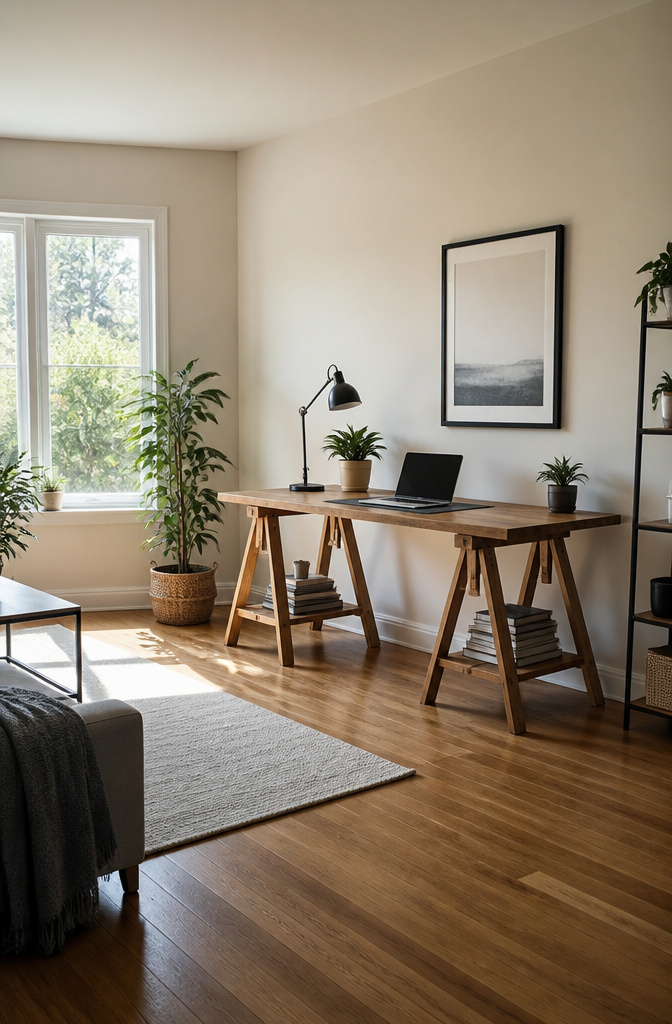
Two freestanding trestles with a slab laid across them make the simplest desk that still looks intentional. The legs stand apart, so the whole thing breaks down flat for a move through narrow doorways or up stairs, and a renter can swap the top later without touching the base. That matters more than it sounds: a stained pine top works for a year, then gets replaced when you find a better offcut or outgrow the finish.
The IKEA FINNVARD trestles run about $50 each and add height adjustment plus a little shelf space underneath. Cheap workshop sawhorses from a hardware store cost closer to $25 for the pair, though you lose the adjustability. Either way, the desktop itself is where the money goes or does not. A solid-core door, a length of butcher block, or even a sanded plywood sheet dropped on top completes the build. Total spend lands between $70 and $200 depending on what surface you choose and whether you need it cut to length.

【Height Adjustability & Floor Protection】: The adjustable feet are designed to level the legs by the screw on the bottom(adjustment range:1.2 in), it helps you to get a suitable-height and stable table. The feet's material is great for preventing a wobbly table and protecting the floor from scratching.

Desk Wobble Fix: Helps stabilize your standing desk against a flat, vertical wall for a steadier work surface while you type, click, write, or lean on it during everyday use

Don't be fooled by knockoffs. The Original Pettibon System Therapeutic Wobble Chair provides back pain relief with flexion, extension, and 360° of rotation to facilitate all possible combinations of exercise motion. Chiropractor approved and trusted for 30 years.
Shelf Bracket Desk
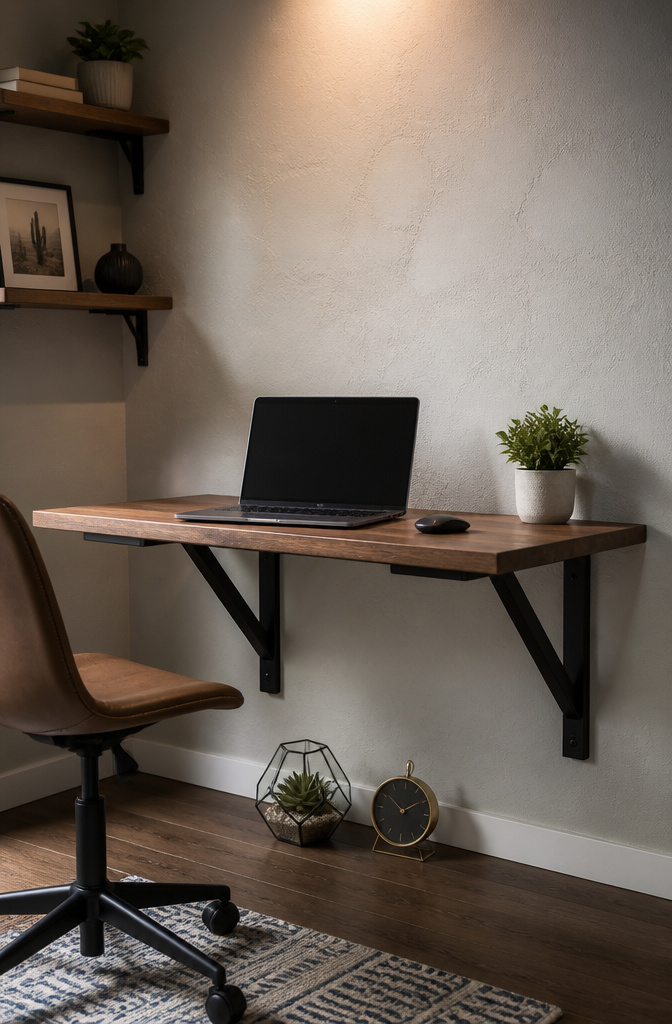
Two heavy shelf brackets and a solid-core door blank make the cheapest wall-mounted desk I have actually built. Brandon Keepers, GitHub’s open-source advocate, landed on the same idea for his standing version and spent about $40 total. The brackets mount to studs, the door rests on top, and you have a work surface that floats clear of the floor.
Bracket spacing changes what that surface can hold. Sixteen inches on center, matching your wall studs, handles a laptop and monitor fine. Widen the gap past two feet and the center starts to bow under its own weight, let alone a printer. I have seen the sagging start inside a month when people ignored this.
The freestanding version puts legs at the front end and brackets at the wall, creating a kind of cantilevered console. It costs more and needs sturdier brackets, but it survives a move because you are not filling anchor holes in drywall.
Adjustable standing desks are great for saving space. Rather than having a large work surface with a standing area, the whole desk raises and lowers according to need. They are, unfortunately, still expensive to buy prebuilt.
That $200 counterweight build from Instructables is the next rung up if you want height change, but the fixed bracket desk stays unbeatable for a first apartment where the deposit already stung.

Durable Construction: Crafted from high-quality UHMW plastic, this crosscut sled is built to last, providing stability and reliability during every cut on your table saw.

7-ply 100% Okoume core
Door Desk
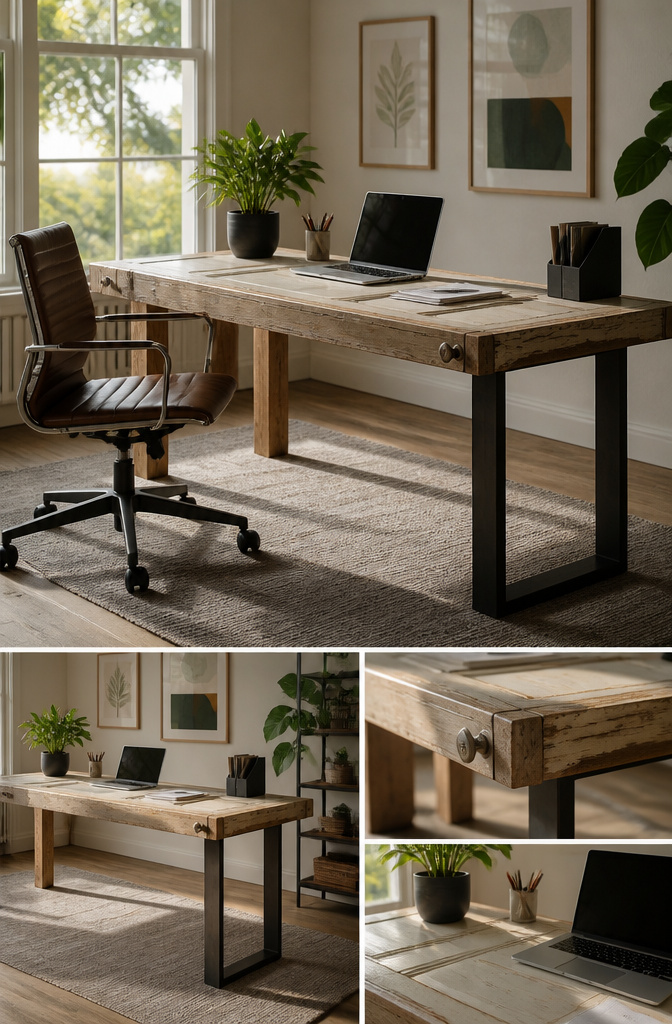
The door desk story starts with Amazon’s early days, when Jeff Bezos and the other founders supposedly used doors to save money. Whether that was genuine thrift or clever startup mythology, the idea stuck. A solid core door gives you a desktop that’s already 80 inches long, pre-finished, and flat, which is more than most lumberyard boards can claim.
Doors come from Habitat ReStores, demolition salvage, or your own basement remodel. The critical check is the knock test: hollow core doors echo and weigh maybe thirty pounds; solid core doors thud and feel like furniture. Flip the door on edge and look at the short side if you’re unsure. Solid wood or a solid composite block will show continuous grain; hollow doors reveal a cardboard honeycomb inside.
Most doors are 80 inches tall and 30 or 36 inches wide. For a desk, you’ll want to cut it down to desk height, usually 28 to 30 inches, which means one crosscut across the width. A circular saw with a straightedge works fine; the factory edge is your best friend here. The leftover strip becomes a shelf or gets tossed.
Cost runs about $120 with a cheap new solid core door, though a salvaged one drops that sharply. The real question is whether you’re saving money or just saving yourself from milling a board flat.
Iron Pipe Desk
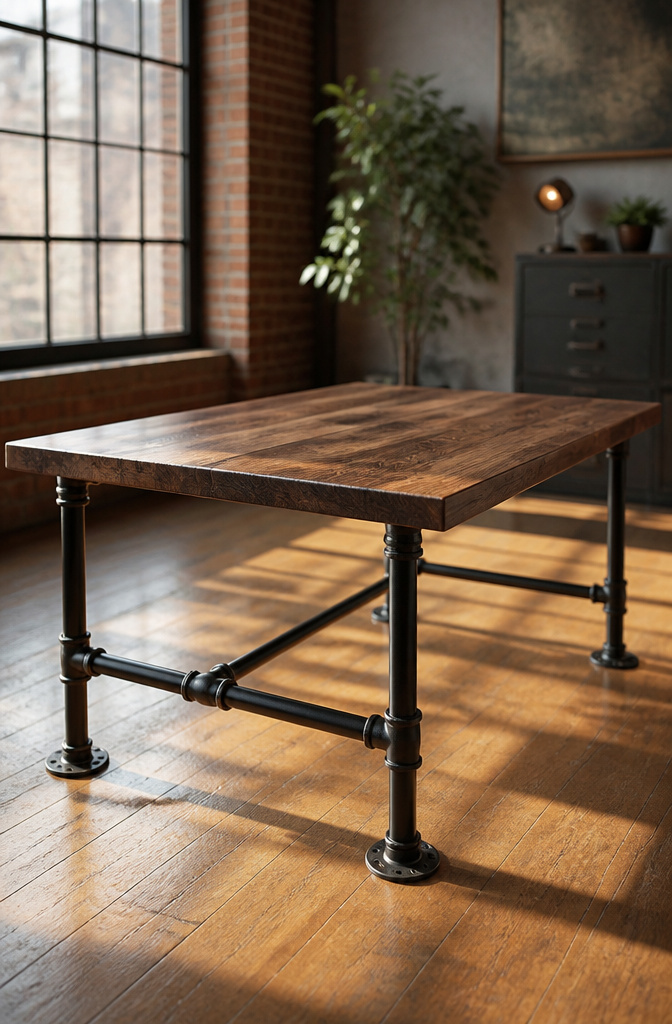
Threaded black iron pipe gives a desk that industrial warehouse look without needing a welder or a machine shop. You have two ways to build the frame. Threaded pipe screwed into floor flanges at each joint lets you adjust height precisely and break the desk down flat when you move, which matters more than you’d think until your lease ends. The other route welds or bolts flanges directly to pipe lengths, making a rigid rectangle that looks cleaner but ships as a solid chunk.
Most of the fittings come from the plumbing aisle at a big-box hardware store, though you’ll need to hunt online for specialty pieces like cross fittings or swivel flanges. Pipe diameter changes the whole feel: three-quarter inch reads as furniture, half-inch reads as plumbing left exposed by mistake.
I lay the whole frame out on the living room floor before the final tighten. The threads have enough play that a slightly crossed elbow puts the whole rectangle out of square, and you only notice the wobble after the desktop is already bolted on. Spin everything finger-tight, measure corner to corner, then walk the pipe wrench around once. The floor assembly takes an extra twenty minutes and saves an hour of staring at a rocking desk, wondering which joint to blame.
Adjustable Standing Desk
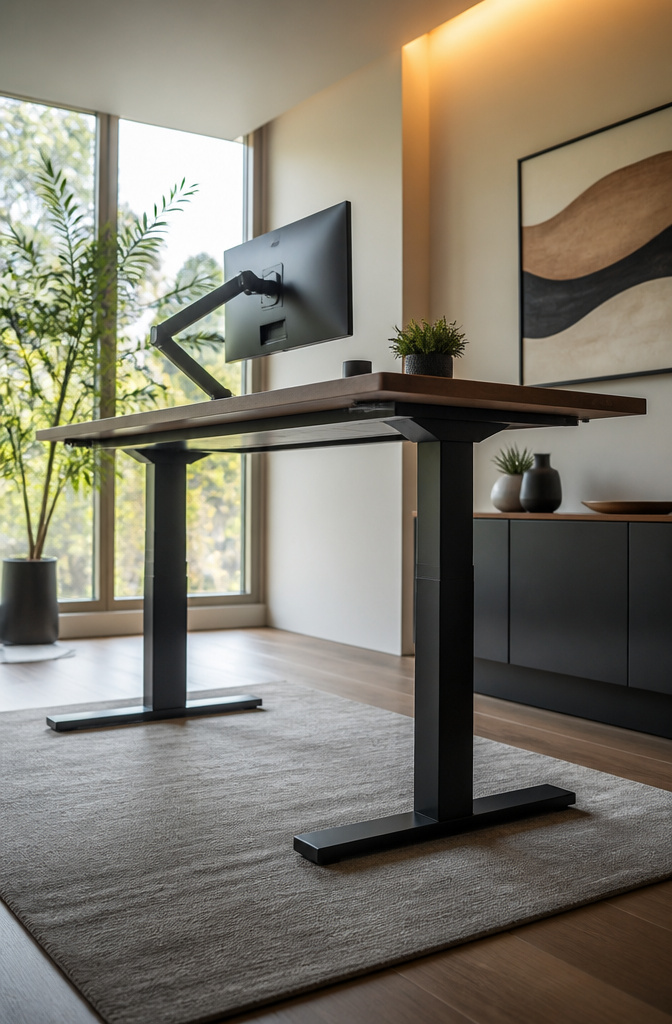
An adjustable standing desk lets you raise or lower the whole work surface rather than adding a separate shelf, which saves space and keeps monitors at the right height whether you sit or stand. The catch is the mechanism. Electric actuators have dropped enough in price that a DIY build can run about $175, and the result changes height at the flick of a switch. A manual counterweight system costs closer to $200 and needs only hand tools, but you are the motor every time you want to move it.
I have not built one myself despite the ergonomic appeal. The sources I trust for desk plans lack specific height measurements, and without knowing whether the travel range clears my knees when seated or my elbows when standing, I am not cutting lumber. A desk that stops two inches short of where your body needs it is a desk you stop using. For now I work around the problem with a fixed-height build and a separate monitor arm, which is less elegant but does not leave me guessing.
Materials
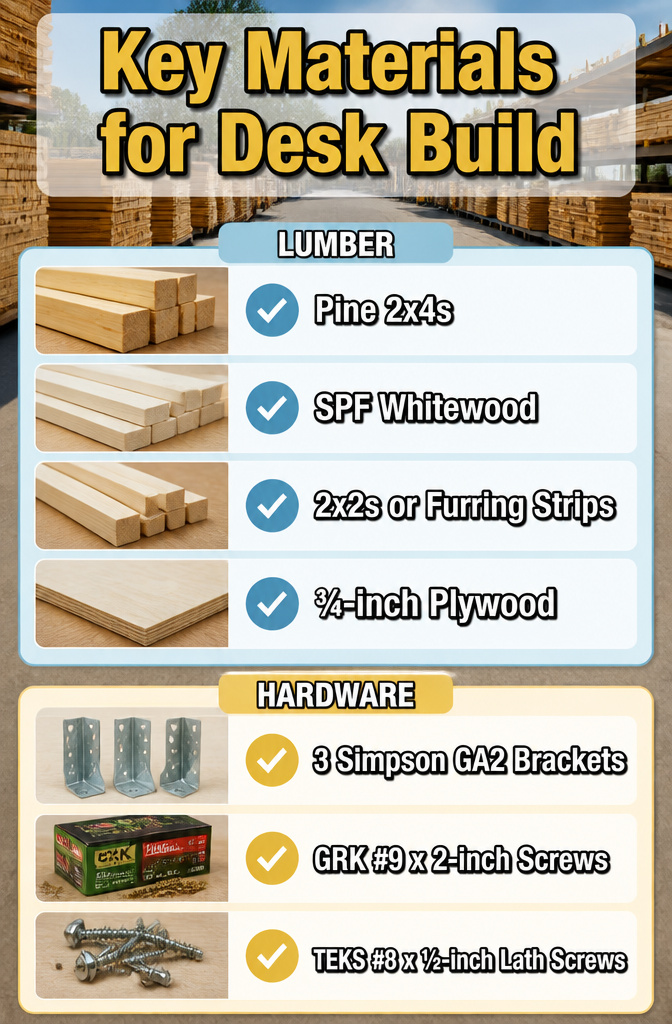
Pine 2x4s and SPF whitewood are the lumberyard staples that keep these builds under $100. A basic frame needs three 10-foot 2x4s, one 8-foot 2×4, and two 8-foot 2x2s, plus a 4-by-8 sheet of ¾-inch plywood for the top. Simpson Strong-Tie GA2 brackets and a box of GRK #9-by-2-inch screws hold the frame together; TEKS #8-by-½-inch lath screws work for the bracket connections.
- Furring strips substitute for 2x2s if the price gap is wide that week; the desk loses a little stiffness but survives a monitor and keyboard fine.
- Cabinet-grade plywood runs more than construction ply, but either skins the surface smooth enough for a mouse.
- The full material spread lands between $30 and $200 depending on whether you build a simple leg-and-top frame or a three-sheet plywood cabinet desk with monitor cutouts.
- Skip the hardwood plywood unless the desk is also the room’s showpiece; the $200 ceiling already covers a standing-desk mechanism built from counterweights and basic hardware store stock.
Tools
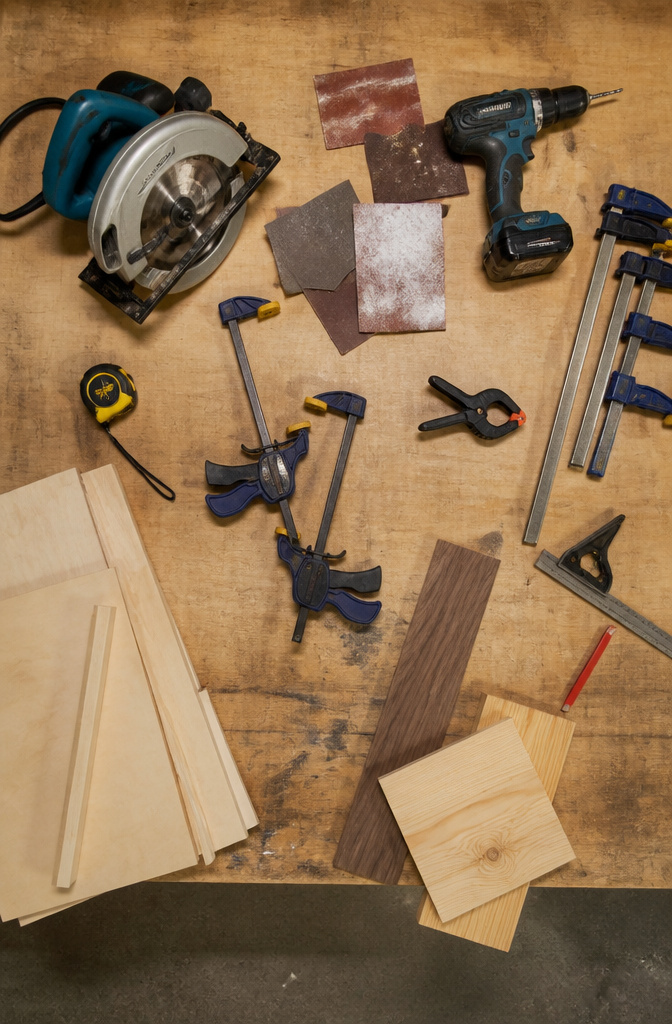
A circular saw or miter saw handles every straight cut on a desk this size, and most renters already own one or know someone who does. The drill drives the screws; clamps hold the frame square while you do it, which matters more than the brand of either tool. A sander saves hours of hand work on the top, though 80-grit paper and patience will get there too.
Borrow what you can, buy the clamps. Sources that mention pocket-hole joinery call out the Kreg Jig K4 by name, and that is one tool with no real substitute; the joints simply do not work the same way without it. A router with a ¼-inch roundover bit cleans up visible edges nicely, but a block plane or even careful sanding achieves a similar feel. Biscuit joiners and CNC rigs show up in some builds, yet nothing in a basic desk plan requires them.
Design Comparison
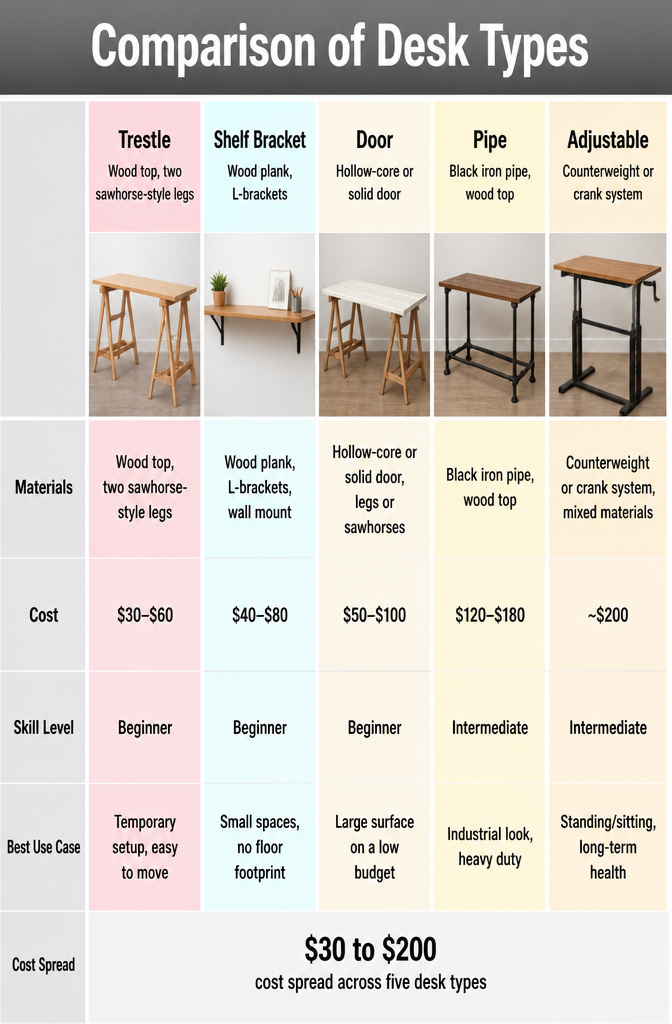
The five desk types that keep coming up span a $30 to $200 cost spread, and the gap is wide enough that budget alone usually decides it before skill level even enters the picture.
| Design | Materials | Cost | Skill Level | Best Use Case |
|---|---|---|---|---|
| Trestle | Wood top, two sawhorse-style legs | $30–$60 | Beginner | Temporary setup, easy to move |
| Shelf bracket | Wood plank, L-brackets, wall mount | $40–$80 | Beginner | Small spaces, no floor footprint |
| Door | Hollow-core or solid door, legs or sawhorses | $50–$100 | Beginner | Large surface on a low budget |
| Pipe | Black iron pipe, wood top | $120–$180 | Intermediate | Industrial look, heavy duty |
| Adjustable | Counterweight or crank system, mixed materials | ~$200 | Intermediate | Standing/sitting, long-term health |
The $30 end gets you a trestle desk built from construction lumber and a pair of folding horses, or even a door slab propped on brackets. At $200, the counterweight adjustable desk from Instructables uses materials cut at Home Depot and only hand tools, but the mechanism takes patience. Pipe desks sit in the middle for cost but need threading or pre-cut pipe, which adds a trip to the hardware store. For renters, the shelf bracket or trestle designs win on portability; the adjustable build pays off only if you actually alternate sitting and standing daily.
Frequently Asked Questions
What type of wood should I use for a desktop?
Common pine boards keep costs down and hold up well for a first build. White oak or walnut step the look up if the extra cost fits your budget. Pine and whitewood take stain differently enough that the same color can read orange on one and muddy on the other, so test on scraps first.
How thick should a wood desktop be?
Solid wood desk tops need to be at least 1-1/4 inches thick for real support. Anything under that flexes when you lean on it, and you will notice the difference. A 1-1/2 to 2 inch thickness reads as more high end if the budget allows.
Can I use a butcher block to make a desktop?
Yes, butcher block makes a handsome top if you want to upgrade. The extra cost pushes the build out of weekend-and-a-few-hundred-dollars territory, so common pine works perfectly well for most first builds.